Friday, October 16, 2015

Fall is Pumpkin Season!

Of course you can cook the seeds from your carved pumpkins and enjoy them with your favorite seasonings, but you can also keep a few seeds to plant your own pumpkins next year!  Last year I got some lovely pumpkins from the local market and thought I would try saving seeds to plant this year.  This year's purchased pumpkin can be next year's pumpkin from your own garden!

Last year's carved pumpkin that supplied the seeds for this year's pumpkin plant!
 
My jack-o-lantern all lit up!
Pick a fun pumpkin from your local market and be sure to write down what kind it is on a plastic baggie.  After carving your pumpkin, collect the seeds and rinse them well.  Be sure to clean off all the pumpkin goo!  Next, spread them out on a towel and allow them to dry for a few days.  Once they are dry, you can put them into your labeled baggie and hang on to them through the winter.  I pinned mine to my basement bulletin board as they keep best in a cool, dark location.

Next summer, around the end of July, pull a few seeds out and plant them in your garden.  Give them lots of room - the pumpkin vines take over!  Water and care for the pumpkin vines as you would your other vegetables.  After they take hold, you should start to see tiny pumpkins forming on the vine!  I learned a lesson the hard way - don't touch the baby pumpkins!  One of mine fell off when I moved the vine to get a better look. 
Tiny baby pumpkin

The pumpkin I planted was a s-l-o-w grower.  Multiple baby pumpkins formed on the vine, but in the end, I just had 1 major pumpkin survive to continue growing.  Once fall takes hold and you want to use your pumpkin for carving or decoration, snip it from the vine and enjoy!  Happy Fall!
Almost ready for picking and carving


Saturday, August 15, 2015

Peppers and onions and cucumbers - oh my!

I'm still getting loads of peppers from the garden.  Besides the ones I've used for recipes, I've frozen more than 20 bell peppers.  A storm came through and knocked a couple of the plants over, so I put stakes in the garden to prop them up.  They don't seem any worse for the wear!
Pepper plant with over 10 peppers in various stages of growth!
In the last post I shared my method of freezing the peppers, so today I wanted to share my grandmother's pickle recipe.  It is a simple recipe that results in delicious sweet pickles!
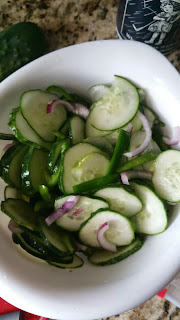
Start by gathering green peppers, onions, and cucumbers.  It typically calls for white onions, but this summer I had red ones coming in so I tried it with them.
Peppers, onions, and cucumbers
Slice up the cucumbers in VERY thin slices (about 4-6 cups).  Also slice the peppers and onions in thin strips (about a cup each).  Put them all in a bowl and sprinkle with a tablespoon of salt.  Stir it up so that the salt gets spread throughout and then cover and place in the refrigerator for 2 hours.  The salt will pull the extra water out of the vegetables.
My sliced mixture
After 2 hours, pull it out of the fridge and drain all the water off.  Separate the vegetables into jars and leave a little space at the top.  In a separate bowl, mix 1 cup of white vinegar and 1 and 1/4 cups of white sugar.  Add 1/4 teaspoon of celery seed and stir until the sugar is dissolved.  Pour this mixture in the jars, covering the vegetables completely.  Add a bit more of the mixture if you need to so that the jars are full.  Screw the lids on tight and store in the refrigerator.  The recipe says that they will last up to 2 months in the fridge, but I have kept the jars of pickles much longer than that if I don't open them.  I found that the red onions dyed the cucumbers pinky/purple, but the flavor is still great.  Using this recipe, you can enjoy your vegetables throughout the winter!


Completed refrigerator pickles!


Wednesday, July 22, 2015

Picked a Peck of Pickled Peppers?

It's hot outside, the sun is high, and the pepper plants are producing.  Last year my pepper plants did so well that I got more than I could eat.  That's when I learned you can easily freeze bell peppers!  I froze so many last summer (more than a dozen) that I haven't had to buy a single green pepper for cooking in the last year!

Pepper plants in the middle, growing tall!
To freeze your peppers, start by rinsing them.  I like cutting my peppers so that I can be lazy later and pull them out and cook them right away.  For freezing, I chop them in large pieces for stir fry and others I dice small for using in chili and soup.  I met a lady once who said she just cut the top out of them and pulled out the pit and seeds, then froze the pepper whole.  

Two of my garden peppers
After I slice or dice, I divide them into freezer bags, suck all the air out, and label the bag with what they are, how I cut them, and about how much it is.  Then just plop them into the freezer.  So easy!  They are ready for your next quick recipe.  I really enjoy using them in spaghetti sauce on a cold winter night.  First, I start by sauteing the diced peppers and onions with a little olive oil and minced garlic and I brown some meat.  For the meat, I typically use very lean ground beef and sometimes I add some sausage for a little kick.  Then add a favorite store-bought spaghetti sauce base and some Italian seasoning.  Heat everything until it's hot and prepare your spaghetti noodles.  Then you are ready to serve a warm homemade spaghetti meal using your pre-diced peppers from the garden.
Sliced, packaged, labeled, and ready for the freezer

Saturday, July 18, 2015

Using all the garden veggies

At this point in the summer, I am over-run with squash and zucchini.  My cherry tomatoes are coming in and I've pulled multiple onions.  My peppers have started growing and I'm wondering what in the world I'm going to do with all these veggies!  Thankfully I found out that the local food pantry accepts fresh vegetables, so I took them over 25 lbs of squash, zucchini, and cucumbers, but that still left me with quite a bit as more comes in every day.

Squash, zucchini, and cherry tomatoes
 When searching online for an easy recipe that used lots of vegetables, I came across this great recipe for corn and zucchini salsa.  I'm not a huge fan of jalapenos, so I doctored the recipe a bit.  I added chopped squash to the zucchini and sauteed both with the onion, garlic, and olive oil.  Due to the large amount of vegetables in my kitchen, I didn't measure anything out and simply chopped what I felt like including - the recipe still turned out fine.  Instead of including the jalapenos,  I used a can of Mexicorn (instead of plain corn), which has green and red peppers in it.  Alternatively, if your peppers are already coming in, you can chop those up and include them, but I would put them into the sauteed mixture to soften them a bit. I squeezed a fresh lime instead of using lemon juice and chopped cherry tomatoes from the garden.  After combining everything, then it was chilled for a few hours.  The result was delicious!  It was a great way to use zucchini, squash, peppers, corn, and onion for a quick, healthy recipe!

Corn and zucchini salsa result!

Wednesday, July 1, 2015

Squash and Zucchini Goodness

About the time the zucchini took off this year we got bombarded with tons of rain and cloudy weather. I would get small zucchini started on the plant, and then it would soon start rotting from the bloom end and turn smushy before ever growing large enough to eat.  What a let down!  I did some research and realized a couple things.  The first was that there are male and female blooms on zucchini and squash.  It was so rainy that the bees were not out and the blooms weren't getting pollinated.  To fix this, you can find a male bloom (skinny stem and long center inside the bloom) and pluck it from the plant.  Carefully peel off the outer petals so you are just left with the center portion.  Then go to each female bloom (will look like a baby zucchini below the bloom and the portion inside the bloom will have multiple ends) and dab it with the male bloom.  Ta-da ~ you pollinated your zucchini!  
The bloom on the left with a skinny stalk is male, the larger bloom on the right with a "baby" zucchini as a stalk is female.

Finally, my zucchini started to grow.  That's when I discovered issue two.....due to all the rain and lack of sun, my zucchini got bloom rot.  Again, more research.  The trick to attempting to avoid bloom rot is to pluck the bloom off the end of the zucchini after it starts growing (and therefore has been successfully pollinated).  It doesn't always work, but it definitely seems to help.  I now do this with all my squash and zucchini.

A healthy zucchini in the middle, with a rotten zucchini at the bottom center of the image.

If you can get a zucchini plant to grow, then you will quickly be overrun with zucchini.  Of course, there is always the go-to zucchini bread recipe, but zucchini can be used for so much more!  Tonight, I tried making zucchini and squash fritters.  I looked up some recipes, but most of them called for large amounts of squash and zucchini and I was the only one eating them.  Instead, I made my own mix (and it isn't very scientific).

So much zucchini and squash!
Zucchini and Squash Fritters

Ingredients
- your favorite shredded cheese (or cheeses)
- zucchini and/or squash
- black pepper
- salt
- all-purpose flour
- an egg
- olive oil

Start by grating your zucchini and squash, then mix in a little salt (to pull the water out, not to taste) and allow it to drain while you mix the rest.  Fix as much as you think you want to eat. 
Put shredded cheese in a bowl (equivalent to about 1/4 of the amount of zucchini/squash you have) and add the egg.  Sprinkle with black pepper.  You can also add some flavorful spices if you wish (garlic, italian seasonings, etc).  Amounts can be adjusted based on how you want it to taste.
Squeeze additional water out of the grated zucchini and squash and add this to your bowl.  Add flour little-by-little, but amounting to about 1/3 to 1/2 of the amount of zucchini/squash you have included.  Mix everything well.  It should be the consistency of typical muffin-type mixes.  Add flour if it is too runny.
Heat a skillet (medium) and add some olive oil to the pan.  Put a spoonful of the mix in the pan and flatten it with a spoon.  Once the first side is browned, turn it over and brown the other side. When both sides are browned, your fritters are done and ready to eat. 
Browned fritters
I made enough to result in 6 fritters and topped them with homemade tzatziki sauce~ delicious!
Let me know how you revised the recipe when you try your own version.

Friday, June 26, 2015

The blueberries taste like....blueberries!

Blueberries are one of my favorite fruits and have been for a long time.  After putting in the fence, I had the perfect spot to add blueberry bushes along the back. Last year I put in two and after they did well I added two more this year.  The blueberry bushes came from a nursery, so they were actually mature enough to produce fruit the first year.  If you purchase the little blueberry plants they sell at the hardware store, it may take a few years for it produce berries. There are many different varieties and different bushes have different flavors.  Some berries are smaller and sweeter, while some are larger and more tart.  I have 3 Patriot and 1 Chippewa - and I can certainly tell a difference between the berries.  You also want to make sure you are getting plants that flower at the same time so you get cross pollination.  Some varieties bloom early while some are late.  Just do your research about what kind of berries you want when shopping for the plants.

Four blueberry bushes and the net cage

With blueberries, you have to fight the birds to get them ripe.  To combat the birds, I built a net cage around the bushes and used rocks to hold the edges down.  I threw a rubber snake on the ground for good measure.  (The snake was an easy addition - found it at the local dollar store.)  You have to wait until the blooms are gone and berries have formed before you put up the net, otherwise it discourages bees and insects from pollinating your bushes.

Blueberries starting to ripen!

After putting up the netting, it was a waiting game.  Thankfully, storms cleared out and the bushes got some hot, sunny days so that the berries ripened.  To pick, I roll up the netting and pick the ripe berries.  It is important to check them every couple of days, because if you don't get them as soon as they ripen the birds and bugs will swoop in.  If you only get a few berries in one picking, you can rinse them and save them in the fridge, then add new berries in a couple days.  In this way, I got a cup and half of berries, which is just what my muffin recipe called for!

A pretty good crop for one picking
 This is the blueberry muffin recipe I tried ~  To Die for Blueberry Muffins.  The muffins turned out great - fluffy, lots of berries, and a fantastic cinnamon sugar crunch on top.  I will definitely be saving this recipe to make again!
Blueberry muffins - from scratch with homegrown berries!

Sunday, June 21, 2015

All Around the Mulberry Bush...

As I cleaned out weeds and briars from the edges of the yard, I found large tree branches hanging with bright berries.  After doing some internet searching, I found out they were mulberries and they were edible!  It turns out the ones in my yard are the shorter variety and turn almost black when ripe.  They are sweet and not overly flavorful.  The best thing about mulberries is how easy they are to "pick".  Grab a sheet or towel and put it down under a tree branch.  Shake the tree and watch the ripe mulberries fall onto the sheet for collecting.


 There are lots of great recipes online that use mulberries and many recipes that call for other fruits (such as blueberries) can have mulberries substituted instead.  To prep the berries, rinse them gently and pick the green stem off as short as possible.  If there is a little green stem left, it won't hurt anything.  For most recipes, you will want to put the mulberries in last and gently fold them into the mix so the berries don't get damaged.  This site contains 10 ideas for using mulberries in recipes: http://sharonglasgow.com/2013/06/mulberry-harvesting-10-ideas-of-what-to-do-with-them/


I tried this recipe and it makes a dense sweet bread.  https://www.pinterest.com/pin/150237337544633028/  I used 4 mini loaves instead of one large loaf and shortened the cooking time.


I made this recipe last year and really liked the orange hint in the flavor.  I cheated on the recipe and just used orange juice instead of squeezing a fresh orange.  http://www.cyber-kitchen.com/ubbs/archive/BREAD/Sweet_Bread_Mulberry_Bread.html


Foraging in the yard can result in tasty summer treats!

Wednesday, June 17, 2015

Tomato Monsters!

While tomatoes seem to be what everyone starts out growing, they aren't my favorite for eating.  As a compromise, I went with cherry tomatoes - small and very snackable!  Tomato plants grow too large for inclusion in the cattle trough, so I planted my cherry tomato plants next to the house.  I put out little wire tomato cages and started watering.  Let's be honest - I was clueless how large these things would get.  By the middle of the summer, my four small cherry tomato plants had become full-blown tomato monsters.  They outgrew the cages early-on, growing out the tops and spilling over the sides.  The tomato octopus arms ran into the yard and mowing around them became difficult.  I couldn't always reach inside and underneath all the stems and leaves to pick the interior tomatoes, so the ones in the center that ripened soon rotted.  I was picking bowls full of cherry tomatoes - giving them away at work and through the neighborhood.  It was a disaster!  Even this year I have cherry tomato plants coming up next to the house from all the ones that were dropped last year.


When this spring rolled around, I knew things had to be done differently.  These tomato monsters needed major taming!  After scoping out options at the local hardware store, the fencing caught my eye.  Rolled galvanized steel fencing - 6 ft tall.  I bought two 6 ft sections (clipping the wire so that horizontal ends were longer and sticking out) and 4 posts.  Here I must include a warning for anyone that may try this themselves - those ends that were clipped are sharp!  I managed to slice my leg on one unloading it from the truck.   I rolled the fencing and turned under the clipped posts with needle-nosed pliers so that it would stay tubular.  Then I stood it up around my baby tomato plants and threaded a post through the wire mesh on either side, driving those into the ground to keep the cage standing.  My hands happen to fit through the openings in the cage, but you could also clip out some of the cage cross-hairs to create larger openings for picking interior tomatoes once your plants are producing.


At first, the tomato plant looked awfully small in that big cage, but now it's almost 5 ft tall and still growing!  As the tomato plant grows, I push the top growth back into the cage so that it continues to grow inside instead of spreading out too much.  Some still snuck out, but this year's tomato plant is much more tamed than the monsters of last year!  Now I just need those baby tomatoes to ripen.  Who has some great cherry tomato recipes?

Tuesday, June 16, 2015

Humble Beginnings

I grew up as a small-town girl with a country heart.  As a child, I got in trouble for digging in the neighbors yard and spent many an afternoon wearing rain boots in the ditch in front of the house.  I had a wildflower garden and helped my grandmother with green beans.  After spending a few years in cities for school and work, I needed to get back out to farmland and cows.  Thank goodness I found a nice place of my own where I could get a dog and dig in the dirt.  The yardwork and gardening have taken over my spare time!  After using many other blogs as resources for my outdoor ideas and questions, I thought I would start my own.  I've definitely learned some things the hard way and hopefully others can benefit from the lessons.  Gardening is a hobby of mine and I certainly don't consider myself an expert, but so far I've had luck getting things to grow.  I look forward to sharing my tips with others and learning about their own gardening experiences!

My garden ideas started small.  I wanted a little raised area for some lettuce and green peppers.  The mess in the backyard had come with the house, so it took a lot of work to get a spot of land prepared.  Given that I now resided in the country, I wanted to keep with the local flavor and decided to invest in a metal tub for my garden!  Luckily I made friends in the neighborhood and managed to snag an old cattle trough with a rusted-out bottom from a local dairy.  I loved that the trough still had the label on the side.


After delivery, it was cleaned out, sprayed with a clear Rustoleum, and holes were drilled in the bottom for drainage.  To prepare the placement area, I leveled the ground, laid out yard fabric, and placed boards down.  The trough was set in place and large rocks were added to the bottom.  To aid with drainage and keep the dirt from filling the space between rocks, I covered them with yard fabric (that was recycled from the overgrown mess I was pulling up in the backyard). 


Then the real filling began - loads and loads of dirt, peat moss, manure, and fertilizer were layered in and stirred.  It took over 2,000 lbs to fill the trough!  Raised garden beds are great for root plants like carrots, onions, and radishes because the ground is soft, allowing them to easily grow.  No tilling required!  It's also convenient for anyone with a bad back or painful knees because it reduces bending and squatting to weed and check vegetables.


Finally, I added my spring cool-weather plants - broccoli, lettuce, and Brussels sprouts for the first year!  (Who knew Brussels sprouts took forever to grow and produce?!?)  And so my gardening adventures began....


"Build houses and live in them; plant gardens and eat their produce" 
Jeremiah 29:5